


- Rapid Vacuum Investment Casting
- Traditional Investment Casting
- Quick Cast and Cast Form Techniques
- Ceramic Mould Casting
TPT offers various technologies for prototyping and short run production of castings.
Rapid Vacuum Investment Casting
Rapid vacuum investment casting is a combination of Rapid prototyping and Vacuum casting technologies. Master patterns are made using rapid prototyping techniques followed by investment casting process.
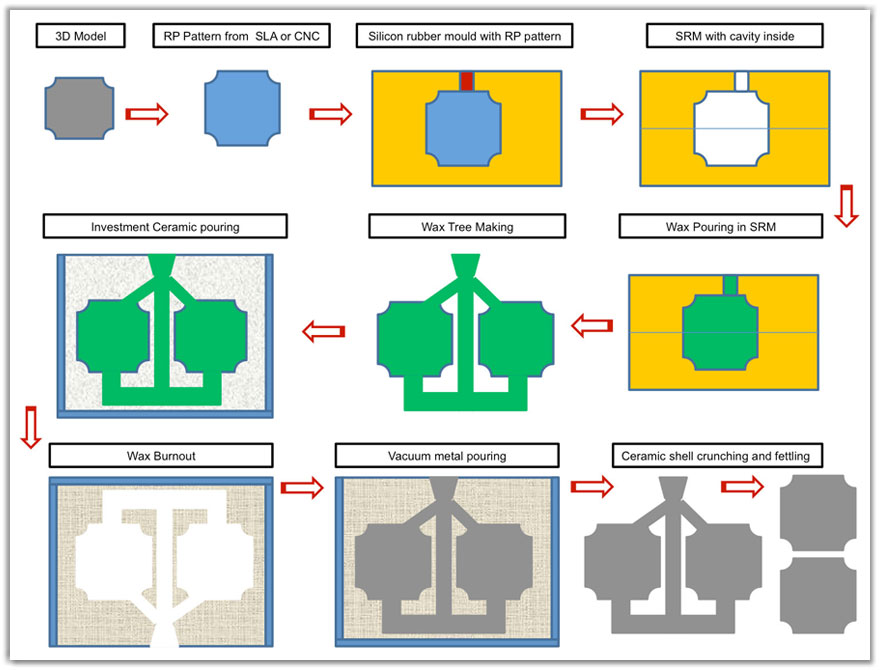
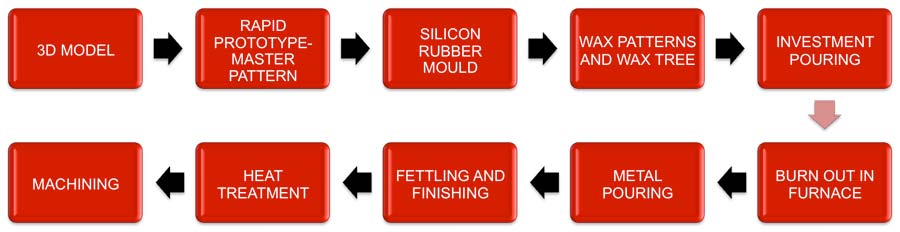
Steps involved in Rapid Vacuum Investment Castings
| 3D CAD model is the Input for our process .This needs to be provided by the customer in STL, IGES or STEP format. | |
| Step 1: | Producing Rapid Prototype Master using SLA or CNC machining. |
| Step 2: | Preparation of Silicon Rubber Mould (SRM) using the RP Master pattern in Vacuum |
| Step 3: | Produce wax pattern (replica of the master pattern) in the SRM. |
| Step 4: | Construction of wax pattern tree by adding sprue, runners and gates. The wax tree is placed in a casting flask |
| Step 5: | Mixing of ceramic investment slurry and pouring under vacuum in to the casting flask . Now the wax tree is completely encapsulated in the investment slurry . |
| Step 6: | The flask is placed in furnace for drying of ceramic and melt out of wax. |
| Step 7: | The flask with the ceramic cavity is placed in the casting machine. |
| Step 8: | Required amount of metal alloy is melted in the induction furnace. Pouring is done under vacuum and over pressure. |
| Step 9: | Flask is removed . The ceramic mould is broken. The metal tree will be fettled and cleaned to get the final castings |
| Step 10: | Heat treatment |
| Step 11: | Machining |
 |
|
| Typical Alloys Casted: LM25/A356, A357, LM4, ZAMAK | |
| Contact Us for detailed information on our process. | |
Advantages
- Vacuum reduces porosity & inclusion
- Cost effective
- Precise dimensional control
- Superior surface finish
- Intricate shapes can be cast
- Variety of aluminium and zinc alloys can be cast
- Reduce Material wastage
- Reduce machining required

Traditional Investment Casting
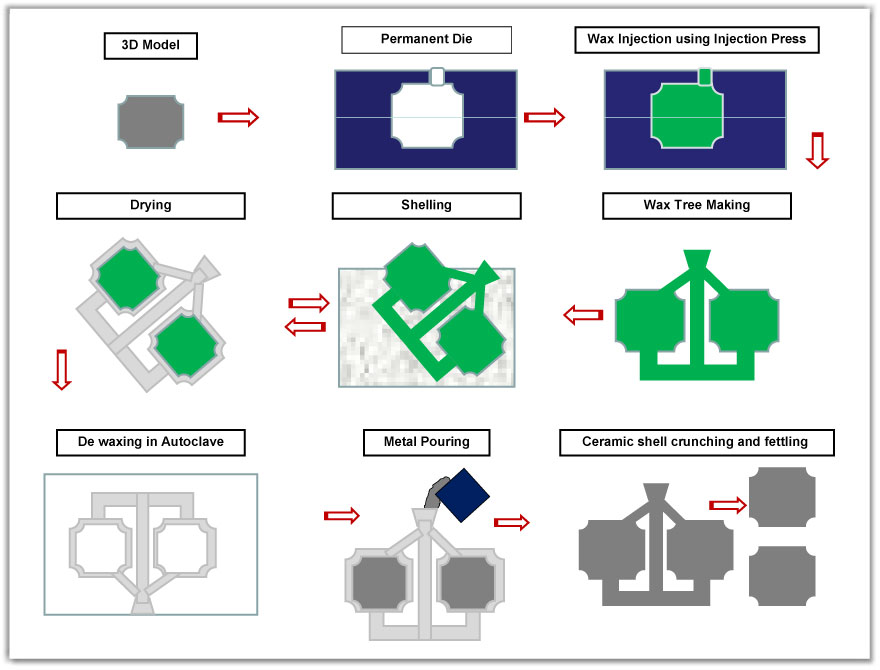
Steps involved in Traditional Investment Castings
| Step 1: | Cad data and 2D drawing from Customer |
| Step 2: | Aluminum Die Making for Wax Patterns |
| Step 3: | Wax Pattern Production from Injection Press |
| Step 4: | Construction of wax pattern tree by adding sprue, runners and gate |
| Step 5: | Ceramic Shelling process to form ceramic shell over wax patterns |
| Step 6: | De waxing in Autoclave and ceramic shell burn out |
| Step 7: | Metal Pouring under Vacuum or Open Pouring |
| Step 8: | Ceramic shell breaking , fettling and finishing |
| Step 9: | Heat treatment and sand blasting |
Advantages
- Ideal for Small Batch Production
- Good for precise components
- Good Dimensional Stability
- Die Cost is less compared to PDC
- Variety of Alloys can be cast
Quick Cast and Cast Form Techniques Casting
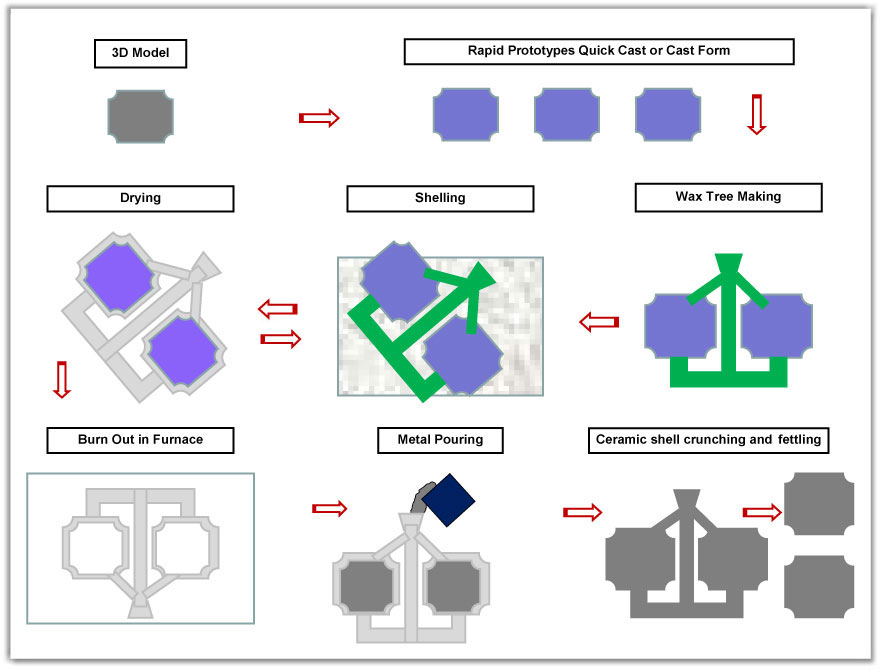
Steps involved in Quick Cast and Cast Form Techniques Casting
| Step 1: | Cad data and 2D drawing from Customer |
| Step 2: | Plastic Patterns from SLA or SLS additive layer techniques |
| Step 3: | Construction of tree with plastic pattern and wax gating system |
| Step 4: | Ceramic Shelling process to form ceramic shell over plastic patterns |
| Step 5: | De waxing and ceramic shell burn out |
| Step 6: | Metal Pouring under Vacuum or Open Pouring |
| Step 7: | Ceramic shell breaking , fettling and finishing |
| Step 8: | Heat treatment and sand blasting |
Advantages
- Ideal for 1-3 nos casting
- Good for design Validation
- Short Lead times
- Any Intricate Shape Can be cast
Ceramic Mould Casting
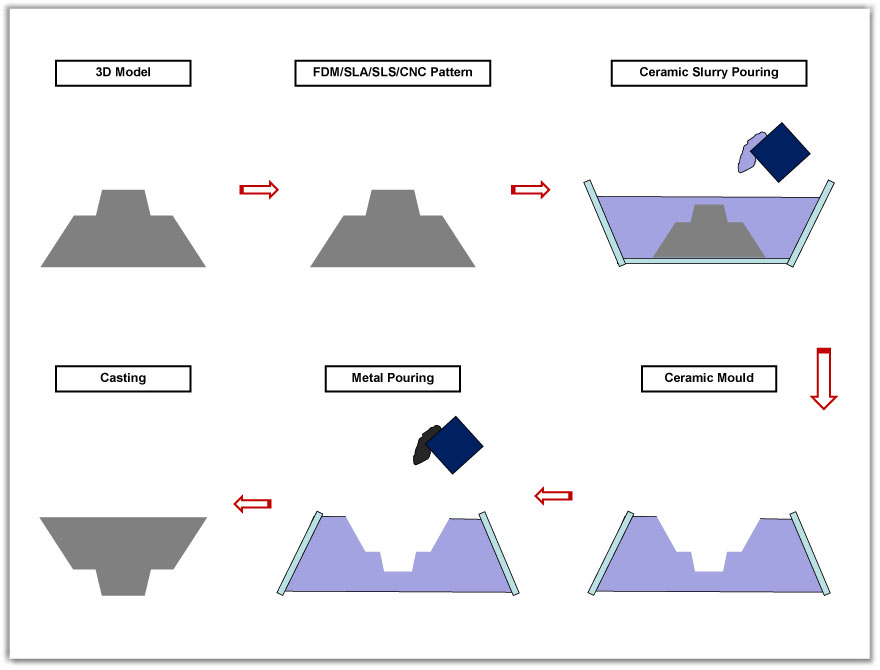
Steps involved in Ceramic Mould Casting
| Step 1: | Cad data and 2D drawing from Customer |
| Step 2: | Plastic Patterns from FDM or CNC machining |
| Step 3: | Mould Making using ceramic |
| Step 4: | Mould Baking |
| Step 5: | Metal Pouring |
| Step 6: | Ceramic shell breaking , fettling and finishing |
| Step 7: | Heat treatment and sand blasting |
Advantages
- Ideal for simple castings
- Comparable to Sand Casting
- Quick Turn around time
- Surface finish better than sand casting